Hello again! I wish to write each day, but it seems (in a very good way) that life gets busy here with new adventures and new people all the time!
Crazily enough, in the past week my husband AND myself have BOTH received jobs! And not just any jobs, but the ones that we presented to the Lord and said "I want this job and I trust that there is a place for me there!" And badabing, just like that, the doors opened! I am officiallya Californian Barista and Mike is working in a local Christian School! It has been such an awesome experience for me, because I really have been hearing God talk to me as a Father who is eager to bless His children. A shift in my perspective has needed to take place. While running around putting in resumés and applications, my husband was encouraging me to not simply seek out of necessity, but from desire. I find that when we get afraid it is easy to just go with the quick and easy fix that is before us, instead of waiting in expectation of the perfect breakthrough and provision. This has all been a learning process for me, because all the while of running around I was becoming more confused about where to go and what to do. It was, in this, that I was listening more to fear and necessity, rather than what does my heart want. Once I decided to only apply where I wanted to work, I found so much each and rest in just waiting. And well, God is always the Good and Perfect Father who is EAGER to give His children every Good and Perfect gift. The challenge is not in Him giving, but in us seeing ourselves as Beloved children who are worthy to receive.In addition, as I have been opening my eyes to the beauty of the area and this new season, even more doors have opened in meeting new people and making new friendships. Like last night, I was invited to a chick flick night kinda deal with a good friend and was able to meet new faces and feel more sunk into the community. Not to mention, dessert was accompanied and it is just unnecessary to turn that down! So, again, things are good.
There truly has been so much fun here! We even went down to Whiskytown Lake this weekend around midnight to watch the Perseid Meteor Shower that only takes place in the Northeastern Hemisphere and, let me tell you, I have NEVER been in a darker night and seen so many stars! It was truly breathtaking!
And amongst all the activities, this month is a big birthday month! My good friend just had her birthday, where we did lots of celebrating, and my husband's is this week (and you better believe I have a BIG surprise in store, however, I regret to inform you that you will have to wait to read about this at a later time, because I am not allowing for any spoilers ;]) AND next is our roommate's and my older brother's birthdays at the end of this month! Geesh! So it is now that I will let you in on our fun little parties this week and the recipe for my yummy gluten, dairy, and refined sugar-free birthday dessert! Yes, it still tasted like sweet goodness.
You better believe that I have been making time for cooking up some fun stuff! Now, my good friend is also gluten free and dairy free, like myself, so I decided to make her an extra special birthday dinner and dessert, of course!
I know this may sound a bit odd (follow me on this bunny trail), but in the mornings I like to go out on the back porch to enjoy my coffee and some early sunshine (that's not the odd part), and right next to our house is a small, family-owned Mexican restaurant where they are usually doing preparations in the kitchen at this time, and somehow, whatever they are cooking always seems to smell like Chick-fil-A to me! Now, they may be frying something and the lovely grease is just tricking my nose, but CFA is a signature scent that my nose knows well! And consequently, I naturally develop a craving for some fried chicken, at this point. Thus, I decided that I would cook up some healthified CFA! And, upon request from my older brother, I decided that this would become the special menu for the birthday night! So, let me let you in on the secret to making gluten, dairy, and refined sugar-free CFA chicken sandwiches!
Now, you may have already discovered that there is quite an archive for mock-fil-a recipes, as such. So I am just going to give you my twist on things. I basically took the standard recipe and just substituted the MSG with good stuff! However, one thing you cannot omit is PICKLE JUICE! Yep, it's true!
So, below, I have posted my recipe: (serves 4)
- 2 chicken breasts (each makes two filets)
- 1 egg
- 1 cup coconut milk (or other nondairy milk)
- 1 cup gf flour ( I used brown rice mix that included xanthan gum. If xanthan gum is not included, then you will need to add 1 T. of xanthan, or arrowroot, or tapioca starch. These act to hold the flour.)
- 1/2 cup pickle juice (dill works best, but I used organic kosher pickle juice and saved the pickles for the sandwiches)
- 1 T. pure maple syrup (this goes in place of the traditional powdered sugar)
- 1/2 t. paprika, garlic powder, black pepper, and salt (I use pink Himalayan salt)
- coconut oil and olive oil for frying (I combine the two for a richer flavor, seeing as the original recipe calls for peanut oil)
- 4 gluten free buns
Step 1: Put chicken breasts in a ziplock bag and take that stress out by tenderizing the chicken with a meat mallet. (This is where Mike has to leave the kitchen, because he is afraid that he may get salmonella by inhaling the raw chicken in the air... hah)
Step 2: Soak the chicken in a medium-sized bowl of pickle juice for one hour to marinate.
Step 3: Prepare the dredging station- mix the egg with the milk and add the maple, then whisk away!
Step 4: Mix the flour with the seasonings on a large plate.
Step 5: After the hour is up, begin to heat the oil on med-hi heat in the pan, while coating the chicken in the wet mix and then the dry. You will want to drain the pickle juice off the chicken first. And remember, one wet hand and one dry hand! (Learned that trick frying things in the South, early on!)
Step 6: Place the breasts in the hot oil (make sure that the oil has not burnt) and cook each side for 5-7 mins., until browned.
Step 7: Let the oil from the absorb on a plate with paper towels (or, in m case, coffee filters because we ran out of napkins!)
Step 8: Butter some gluten free buns and toast them in the oven for a few mins. and prepare your sandwich! I topped mine with organic dijon mustard and original Vegannaise and PICKLES, of course. I also made a little honey mustard mixture to go on the side. You can, also, make yours supreme with lettuce and tomato...OR you can be totally weird and put grape jelly and pickles on it... because that it what one does that has been raised going to chick-fil-a since they were an infant! ;]
I also sliced some russet and sweet potatoes into thick wedges and roasted them for 25 mins. on 425 F.


The Spread!


So crispy on the outside and tender on the inside! Delicious! I can officially say that I am the best Chick-Fil-A in town... and very possibly the only one! ;]

And now, it is dessert time! (Hence, why I only ate half my sandwich, but you know you do it too!) ;]
My friend had showed me this dessert she wanted to try and so I decided to take on the endeavor! The original recipe came from this awesome site http://www.thisrawsomeveganlife.com/2013/04/fruit-coconut-ice-cream-cake-with.html?m=1, however, I did change the cake base to a more fudgy cake!
The original recipe gives great instructions for how to top make this into an ice cream cake, however, I had a little difficulty doing so because I changed things up. It was still delicious, all the same!
You will need the following ingredients:
- 1 banana, sliced
- 1 can (400ml) full-fat coconut milk
- 1 t. pure vanilla extract
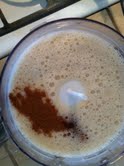
- 1/4 t. cinnamon (optional)
- 2 cups of any fresh or frozen fruit. I used a frozen variety of her favorites: strawberries, blackberries, and mango, and saved slices of fresh kiwi and blackberries for a garnish!
Step 1: Combine all ingredients, except for the 2 cups of fruit, in a food processor or blender and blend until smooth.
Step 2: If you are going to attempt to top the cake with the ice cream, you can line the bowl with some of the fruit for a pretty factor and then pour in the ice cream mixture over top. Then you will add the remainder of the fruit to the bowl. I would suggest lining the bowl with a plastic wrap if you are going to try removing it from the bowl later.
Step 3: Cover with a lid or plastic wrap and place in the freezer for 3-4 hours to freeze (You can prepare the cake while the ice cream is freezing, so that it has time to set up and cool).
Step 4: After the ice cream has set, you can attempt flipping it onto the prepared cake bottom or simply serve on the side or plate each ice cream all fancy, like we did!
Step 5: I prepared a quick chocolate shell sauce to drizzle over each cake! Simply combine 1/4 c. or 2 heaping T. of unsweetened cocoa with 1/4 c. sweetener, such as maple syrup or honey, and whisk in 1/4 c. coconut oil. Tada! So simple (insert Italian mobster accent)! Because coconut oil has a high melting point, it freezes and heats very quickly! Thus, when you drizzle it over the ice cream it makes a special shell trick (look at photos on bottom of page)! Also, Google coconut oil and make yourself feel even better about indulging in this dessert! ;]


Now, for a flourless, gluten, dairy, and refined-sugar free fudgy chocolate cake (yes, it still tastes like sweet goodness), this is what you will need:
- 4 eggs
- 1 t. pure vanilla extract
- 1/3 c. coconut oil
- 1/2 c. or 4 heaping T. unsweetened cocoa
- 1/4-1/3 c. of pure maple syrup (or other sweetener of choice; honey or alter measurements for stevia)
- 1/4 t. pumpkin pie spice
- 1/4 c. cooled coffee
- 1/3 c. toasted, chopped walnuts (optional)
Step 1: Preheat oven to 350 F.
Step 2: mix all wet ingredients.
Step 3: Add in dry ingredients.
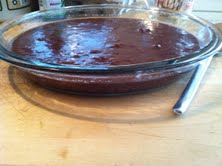
Step 4: Pour into prepared cake pan. (I used a 9-in. pie dish)
Step 5: Bake for approx. 25 mins. or until cooked through and surface springs back to touch.
This is all you will need! This cake, seriously, is so easy!


Before and after the oven!

I, also, clipped some fresh flowers from the yard to decorate the cake for a special display!

All garnished up and having a good time!


I hope these recipes come in handy for a special occasion and if you have any questions or suggestions you know where to find me! ;]
No comments:
Post a Comment